 |
 |
Manned Ornithopters Full History History Archive
Getting Started How to Design & Build Competition Info Design Tools
Design Manual Newsletter Free Plans
Teachers Guide Web Site Links
About the Society Contact Info |
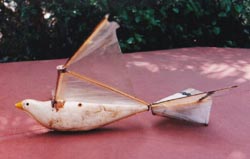
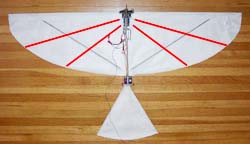
Ornithopter Wing Design As with the flapping mechanism, there are many ways to build an ornithopter wing. The simple "membrane" type of ornithopter wing is the most commonly used. This is not only because it is easy to build. It is also the most consistently successful ornithopter wing design. The membrane wing consists of a spar, at the leading edge of the wing, and a membrane, which extends backward from the spar and attaches to the body of the ornithopter.
Notice that the rigid structure is concentrated at the front of the wing. The same is true for birds, bats, pterosaurs, and almost all insects. The more flexible membrane portion of the wing will passively lag behind the rigid wing spar. When the wing is going up, it will also tilt upward. When the wing is going down, it will angle downward. We refer to this as "twisting" of the wings. It is an important fundamental motion of flapping wings, equally as important as the flapping motion.
However, the stabilizer, or tail surface, holds the ornithopter at a slight upward angle. This means the wing during the downstroke doesn't point exactly in the direction it is going, but it has a slight angle called the "angle of attack". As with any airfoil, the angle of attack causes the wing to produce a lift force that is roughly perpendicular to the travel direction of the wing through the air. This is the blue arrow in the diagram. This also drives the ornithopter forward through the air. What about the upstroke? People often wonder why the upstroke of the bird's wing doesn't push the bird back down. It's because the angle of attack is adjusted, so that the wing can pass easily through the air. When the angle of attack is near zero, there is a minimum of air resistance on the wing, and no perpendicular force is produced. That is what we want, for the upstroke. (Actually though, the inner part of the wing doesn't have much up-and-down motion. It acts a lot like the fixed wing of an airplane, and still produces lift during the upstroke as well as the downstroke.)
Various materials may be used for the construction of membrane wings. Traditional rubber-band-powered ornithopters are made from balsa wood, with either a lightweight tissue paper, or a plastic film forming the wing membrane. Radio controlled ornithopters mostly use carbon fiber rods for the wing spars. It is also possible to make wing spars from bamboo. The wing membrane can be made from a plastic film. This is suitable, even for very large RC ornithopters. Look for a crisp, "cellophane" type of plastic, instead of a limp saran-wrap type. Sometimes a woven fabric is used. The fabric wings can look very professional. However, it will be difficult to find a woven material that is crisp, lightweight, and airtight. Some of the fabrics specially made for kites may be appropriate. The Ornithopter Design Manual has more information on assembling fabric wings. It is possible to actively drive the twisting of the wing, instead of relying on the flexible membrane structure. In principle, this would allow more control over the angle of attack, perhaps resulting in more efficient flight. However, the active wing twisting requires a more complex wing design and flapping mechanism.
|
||||||||||||||||||||